Persistent variables are those variables that hold their last run value. It uses the Current Value as the true value for the next run. Hence, the Current Value changes in each run and gets updated each time. Persistent variables can be defined for all tasks in a Workbook or Workflow.
If a variable is not persistent, it considers the Default Value as its true value. It does not hold on to the last run value and uses the Default Value as the true value for the next run. Hence, each run is initialized from Default Value, and the Current Value remains constant at the end of each run.
Note: | In Rubiscape, the created variables in the Workbook and Workflow are persistent by default. You can make them non-persistent on the Manage Variable page. |
Adding a Variable
To understand the working of the Persistent variable, first, the variables should be added.
For this, follow the steps given below.
- Create a Workbook. Refer to Creating a Workbook.
- Add Variable1 and Variable2 using the Manage Variable window. Refer to Adding a Variable.
- Select the Default Value and the Current Value for the two variables. Here, Variable1 should be persistent, and Variable2 should be non-persistent.
- Keep the checkbox for Variable1 selected below the Make Persistent
- Clear the checkbox for Variable2 below the Make Persistent. Now, Variable1 is persistent while Variable2 is non-persistent.
Difference between Persistent and Non-Persistent Variables
To understand the difference between persistent and non-persistent variables, changes are made to these variables. For this, follow the steps given below.
- Drag and drop RubiPython on your Workbook canvas.
- Click the RubiPython node and click Configure.
- Write a simple Python code in Python Code Editor using Variable1 and Variable2. Refer to Writing Custom Code using RubiPython. Here, ten is added each to Variable1 and Variable2.
- Click Close.
- Click Save on the Function Pane of the Workbook.
The Workbook is saved. - Click Run on the Function Pane of the Workbook.
The Workbook is run successfully. This is indicated by a green icon () on the RubiPython node. - Click (x) Variable on the Function Pane of the Workbook.
The Manage Variable window is displayed. You can see the changed current values for the two variables.
- For Variable1 (persistent variable), the Current Value is 20 (10+10). Thus, the earlier Current Value is considered as the true value for the first run.
- For Variable2 (non-persistent variable), the Current Value is 25 (15+10). Thus, the Default Value is considered as the true value for the first run.
- Perform steps 6 and 7 again on the RubiPython node to run it for a second time.
The Manage Variable window is displayed. You can see the newly changed current values for the two variables.
- For Variable1 (persistent variable), the new Current Value is 30 (20+10). Thus, the Current Value (20) after the first run is considered the true value for the second run.
- For Variable2 (non-persistent variable), the Current Value is 25 (15+10). Thus, the Default Value is considered as the true value for the second run.
In Rubiscape, there are different Run commands. These are:
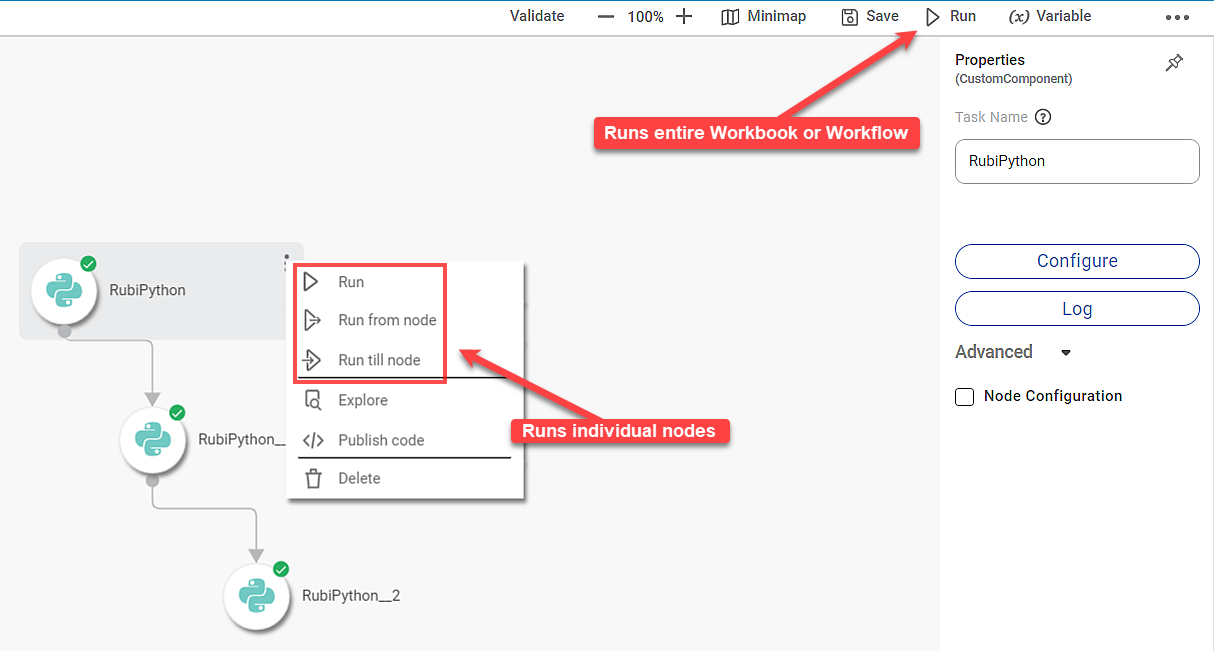
- Run present on the Function Pane to run the entire Workbook or Workflow
- Run, Run from node, and Run till node in the Node Menu to run an individual node(s)
Behavior of Variables
Whether a variable behaves as persistent or non-persistent for different Run commands, there are the following cases:
Case | Variable Behavior | Description |
Use the Run command on the Function Pane of a Workbook or Workflow | (As per the assigned flag in the Manage Variable window.)
|
|
Use the Run, Run from node, and Run till node commands on the node menu | Both persistent and non-persistent variables behave as persistent variables. |
|
To explain the cases mentioned above, let us consider an example of a Workflow. The following steps are followed in the execution of the Workbook.
- Follow steps 1 to 5 of Adding a Variable for adding variables Variable1 and Variable2.
- Drag and drop three RubiPython nodes on your Workbook canvas.
- Click each RubiPython node and click Configure.
- Write a simple Python code in Python Code Editor using Variable1 and Variable2. Refer to Writing Custom Code using RubiPython.
Here, 100 is added to Variable1 and Variable2 in each of the RubiPython nodes. - Click the Run till node command on the RubyPthon__2 node.
Figure: Running the Workflow using Run till node command.
The Run till node command runs the three nodes one-by-one. A green icon appears on each of the RubiPython nodes after each of them is successfully run. - Click the (x) Variable on the Function Pane of the Workbook.
The Manage Variable window is displayed. You can see the changed current values for the two variables.
- For Variable1 (persistent variable), the Current Value is 310 (10+100+100+100). Thus, the earlier Current Value is considered as the true value for each run.
- For Variable2 (non-persistent variable), the Current Value is 320 (20+100+100+100). Thus, even though the variable was selected as non-persistent, it takes the Current Value (and not the Default Value) as the true value for each run. It means that Variable2 behaves as a persistent variable.
Table of Contents


