The created Parameter can be used in the Dashboard on any page. To use the Parameter, we first create a Calculated Column based on the Parameter.
To create a Calculated Column, follow the steps given below.
- Open the Dashboard in edit mode. Refer to Opening the dashboard.
The Dashboard is displayed. - Add a dataset to the Dashboard. Refer to Adding a dataset to the dashboard.
- In the DATA pane, click the ellipsis corresponding to the dataset, and then click Add calculated column from the listed options.
The Add Calculated Column page is displayed.
- Enter the Calculated column name.
- Select the Variable Type from the drop-down.
|
|
Creating Calculated Column by Creating an Expression
To create an Expression, follow the steps given below.
- Perform steps 1 to 5 of Adding Calculated Column to Dataset.
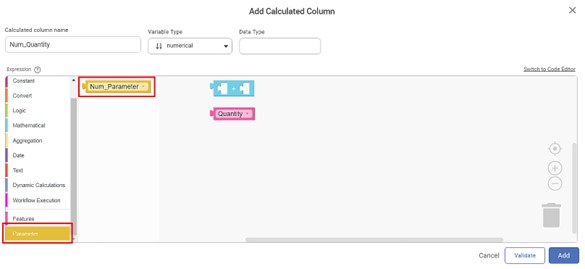
In this example, the Calculated column name is Num-Quantity and the Variable Type selected is numerical. - In the left pane, click the Expression that you want to apply. In the example, we use the Mathematical
Corresponding operators are displayed. - Select the required operator.
In the example, the Addition operator is selected.
The selected operator is added to the canvas. - Click Features in the left pane.
The feature block is added to the canvas.
In the example, we select the Quantity variable as the feature. Click the feature block and select the required feature from the drop-down.
Click Parameter in the left pane.
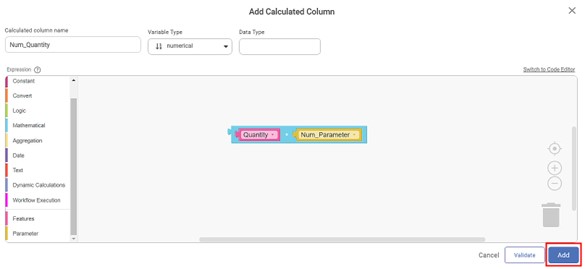
The created Parameter is displayed on the canvas. In the example, the Numerical Parameter created is displayed on the canvas.Based on your requirement, add the Feature and Parameter to the operator and create your expression
Click Validate.
If the expression is valid, a confirmation message is displayed in the bottom-left corner.Click Add.
The selected Parameter is added as a column to the dataset.
In the DATA pane, click the Measures drop-down.
The newly added Calculated Column is displayed in the list with a © symbol.
The selected Parameter can be used with the newly created Calculated Column. In the example, the Numerical Parameter Num_Parameter can be used with the newly created Calculated Column, Num_Column.
Creating Calculated Column using Code Editor
Alternatively, you can use the Code Editor to build your expression to create a Calculated Column.
To create a Calculated Column using Code Editor, follow the steps given below
- Perform steps 1 to 3 of Adding Calculated Column to Dataset.
- On the Add Calculated Column page, click Switch to Code Editor in the Expression Builder canvas top-right corner.
The Code Editor window is displayed - Enter the Calculated column name.
- Select the Variable Type from the drop-down.
- Type the required code in the canvas.
- Click Validate.
If the expression is valid, a confirmation message is displayed in the bottom-left corner. - Click Add.
The selected Parameter is added as a column to the dataset.
In the DATA pane, click the Measures drop-down.
The newly added Calculated Column is displayed in the list with a © symbol. The selected Parameter can now be used with the newly created Calculated Column.
Creating Calculated Column using Parameter
You can create a Calculated Column using a newly created Parameter directly, then validate it, and use it in the Dashboard.
To create a Calculated Column using a newly created Parameter, follow the steps given below.
- Perform steps 1 to 5 of Adding Calculated Column to Dataset.
In this example, the Calculated column name is Cat-Column and the Variable Type selected is categorical. - In the left pane, click Parameter.
The created Parameters block is added to the canvas. - Click the Parameter block and select the required Parameter from the drop-down.
In the example, we select the Cat_UIParameter, which is a categorical parameter. - Click Validate.
If the Parameter is valid, a confirmation message is displayed in the bottom-left corner. - Click Add.
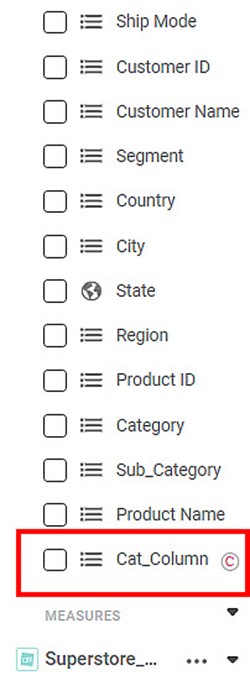
The selected Parameter is added as a column to the dataset. In the DATA pane, click the Dimensions drop-down.
The newly added Calculated Column is displayed in the list with a © symbol. The dataset can be used with the newly added Calculated Column.Note:
You can abort the addition of the Calculated Column and close the page by using Cancel.
Creating Calculated Column using Workflow
You can create a calculated column using workflow if the following conditions are satisfied.
- You should have at least one workflow in the same project.
- The workflow contains only a single flow.
- The workflow must have a single reader and a single writer.
To create a Calculated Column using a newly created Parameter, follow the steps given below.
- Perform steps 1 to 5 of Adding Calculated Column to Dataset.
In this example, the Calculated column name is WF_Column and the Variable Type selected is categorical. - In the left pane, click Workflow Execution.
The Actual Execution block is added to the canvas. - Actual Execution block will require the following 3 inputs.
- Workflow Name – You need to provide the existing workflow name. The workflow should exist in the same project as of dashboard. Kindly note that the workflow name is case-sensitive. You need to provide an exact match.
- Mapping JSON – This parameter is used to map the workflow dataset columns with dashboard dataset columns.
- This mapping is mandatory. You must provide a minimum of one mapping.
- You can map more than one column over here.
- Please ensure that both columns’ data type is the same. The mapping fails in case of mismatched data types.
- Kindly note that unmapped rows are ignored in the widget chart.
- Output Column Name – You need to specify the output column name over here.
- Please specify a single column name from the workflow dataset.
- This column acts as an input column to the calculated column.
- Please make sure the data type of the output column and the data type of the calculated column is the same.
- The Output column name is case-sensitive. The same name will appear in the widget.
- Click Validate.
A confirmation message is displayed in the bottom-left corner if the expression is valid.
- Click Add
The selected column is added to the dataset.
- In the DATA pane, click the Dimensions drop-down.
The newly added Calculated Column is displayed in the list with a © symbol. The dataset can be used with the newly added Calculated Column.
Table of Contents


